Set up VPN site-to-site connection via AWS
Digital transformation is already an integral part of today's working world. Currently, the Corona pandemic is a driving force for a digitalization push toward the future.
Numerous companies have therefore established various home office models over the past year. For example, it is particularly important that all employees are always securely connected to headquarters via a VPN site-to-site connection.
VPN site-to-site connection via AWS
With more than 200 services, Amazon Web Services (AWS), is the world's most comprehensive and widely used cloud platform. (Source)
The AWS VPN solution establishes a secure connection between on-premises networks, remote offices and client devices. To do this, an encrypted tunnel is used to create a connection between the corporate network and AWS. (Source).
When does a VPN connection make sense? - You can find an answer to this in the past blog article from our VPN blog series.
Site-to-Site VPN Connection: AWS Step-by-Step Guide
To create a site-to-site VPN gateway connection from the local network to the virtual network on AWS, there are a few steps to follow:
Step 1: Create a customer gateway
Step 2: Create a target gateway
Step 3: Configure routing
Step 4: Update your security group
Step 5: Create a Site-to-Site VPN connection
Step 6: Configure the customer gateway device
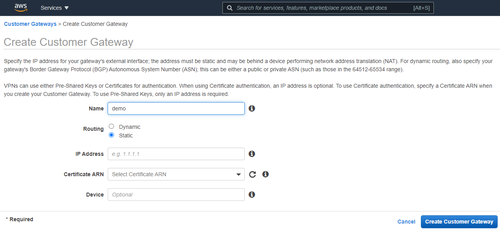
Step 1: Create a customer gateway
- Search for VPC on AWS Console, on the left, click on Customer Gateways (inside the Virtual Private Network Section)
- Click on Create Customer Gateway and fill in the necessary fields (the IP Address is the address of your device on your on-prem network)

Step 2: Create a target gateway
- Search for VPC on AWS Console, on the left, click on Virtual Private Gateways (inside the Virtual Private Network Section)
- Click on Create Virtual Private Gateway, fill in the Name tag and click on Create Virtual Private Gateway.

- Once the Virtual Private Gateway is created, select it, and then choose Actions, Attach to VPC.

- Select your VPC from the list and choose Yes, Attach.
Step 3: Configure routing
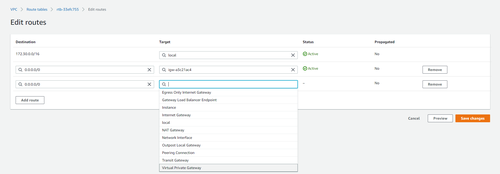
- To enable your virtual machines in your virtual network on cloud to reach your on-prem network, you must configure your route table.
- Search for VPC on AWS Console, on the left, click on Route Tables (inside the Virtual Private Cloud section)
- Select the Route table associated with your VPC, and then choose Actions, Edit Routes.
- Click on Add route, set Destination as 0.0.0.0/0 and for Target, choose the Virtual Private Gateway and select your Virtual Private Gateway created in the step above.
Step 4: Update your security group
- Search for VPC on AWS Console, on the left, click on Security Groups (inside the Security section)
- Select your default Security Group, then choose Actions, Edit Inbound rules.
- Add rules that allow inbound SSH, RDP, and ICMP access from your network and then choose Save rules.

Step 5: Create a Site-to-Site VPN connection
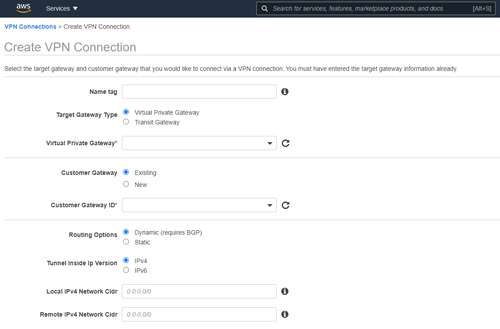
- Search for VPC on AWS Console, on the left, click on Site-to-Site VPN Connections (inside the Virtual Private Network section)
- Virtual Private Gateway field select your recently created Virtual Private Gateway.
- In the Customer Gateway ID fields, select your recently created Customer Gateway.
- Click on Create VPN Connection.

Step 6: Configure the customer gateway device
- Search for VPC on AWS Console, on the left, click on Site-to-Site VPN Connections (inside the Virtual Private Network section)
- Select your VPN connection and choose Download Configuration.
- Select the vendor, platform, and software that corresponds to your customer gateway device or software. If your device is not listed, choose Generic. Choose Download.
- Use the configuration file to configure your customer gateway device. The customer gateway device is the physical or software appliance on your side of the Site-to-Site VPN connection.
Our VPN site-to-site connection blog series is comprised of several posts. Learn how to set up your VPN connection with cloud providers Microsoft Azure and IBM step-by-step in our next blog article.
Recommended articles
All blog articles