Platform as a Service using the example of Django on Azure App Service
"Platform as a Service" (PaaS) defines cloud computing services provided by various cloud providers to facilitate the work of developers, among others. Thanks to this type of cloud computing, they can concentrate on more important things, such as writing code. In the first parts of our "Platform as a Service" blog series, we have already looked at general benefits of PaaS and the examples of Django on Beanstalk, as well as Django on Google App Engine.
In the fourth part, we will now look specifically at Platform as a Service on Azure App Service.
Microsoft Azure App Service: Definition and Benefits
Microsoft Azure is one of the best cloud providers around, offering a variety of services for every occasion. One of the main reasons it's so high quality is that Azure allows for easy mobility and a reliable, consistent platform between on-premises and public cloud. (Source)
Azure PaaS is ideal for these uses
As described before, Platform as a Service is used in Business Organizations for scenarios like Development Framework and Business Intelligence. PaaS offers more features of business tools, middleware, and development tools. In general, using Platform as a Service with Azure App Service is ideal for: (Source)
• Development teams in businesses who want to significantly reduce the time it takes their applications time to get on the market.
• Organizations that have high operational costs that want to lessen the administration needs for a set of applications.
• Organizations that require critical support metrics for usage and chargeback.
• Organizations that want to slash costs spent on IT and reduce database elements and operating systems complexity while increasing scalability.
• Businesses that want to improve the quality of service of their company can greatly benefit from PaaS.
The major service interesting for this topic is App Service. As official website says:

Django on Azure App Service: A Step-by-Step Guide
Azure App Service is a fully managed web hosting service that supports Python 3.7 and higher apps hosted in a Linux server environment. Following the official instructions, a whole process should be simple.
Here goes step-by-step guide: (Source)
REQUIERMENTS: Azure profile and finished sample of application in Django
1) Set up your initial environment
2) Clone the sample
3) Run the sample
4) Deploy the sample
5) Browse to the app
6) Redeploy updates
7) Stream logs
8) Manage the Azure app
9) Clean up resources
But we will go step-by-step, describing complete procedure.
Django on Azure App Service: Implementation in Detail
First of all, we need an application in Django framework which we can use. For example, Azure has a sample application on GitHub so everyone can clone repository and use for trainings.

To run application locally, in CMD we need to switch to the cloned repository, create virtual environment for the app, install dependencies and after all run the app.

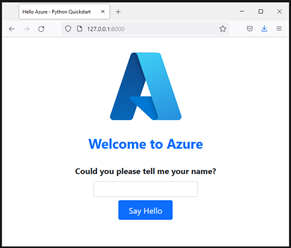
In web browser enter http://localhost:8000 and it should be visible Django python application.
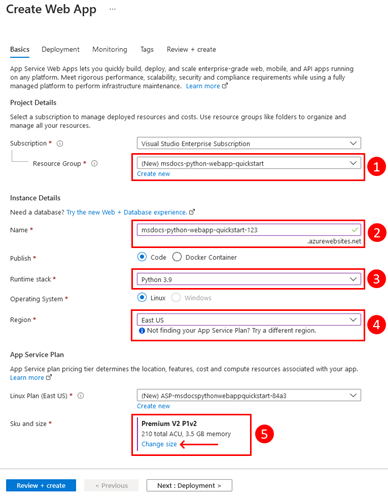
To host your application on Azure, you need to create Azure App Service web app in Azure. You can create a web app using the Azure portal, VS Code using the Azure Tools extension pack, or the Azure CLI. For easiest way - through Azure portal, in search bar at the top enter “app services”. Select the item

labelled “App Services” under the under Services heading on the menu that appears below the search bar. Click on +Create and fulfil required fields: Resource group, Name, Runtime Stack, Region and App Service Plan.

Azure App service supports multiple methods to deploy your application code to Azure including support for GitHub Actions and all major CI/CD tools. In this article we will explain deploy through ZIP file.
When deploying a ZIP file of your Python code, you need to set a flag to enable Azure build automation. The build automation will install any necessary requirements and package the application to run on Azure. Build automation in Azure is enabled by setting the SCM_DO_BUILD_DURING_DEPLOYMENT app setting in either the Azure portal or Azure CLI. Next, create a ZIP file of your application. You only need to include components of the application itself. Once you have a ZIP file, the file can be uploaded to Azure using either Azure CLI or an HTTP client like Postman or cURL.
Congratulations! You have deployed your Django app to App Service.
To check your app, open web browser and enter URL: http://<app-name>.azurewebsites.net. It can take a minute or two for the app to start, so if you see a default app page, wait a minute, and refresh the browser.
All in all, we can also see from this Platform-as-a-Service example of Django on Azure App Service that cloud computing in general and PaaS in particular are becoming more and more popular and mature. Would you like to read more blog posts on topics like Cloud, Cloud Computing or Platform as a Service? Then feel free to visit our blog and the cloud blog category.
Recommended articles
All blog articles